Interesting Trailer Tire Facts

Anyone who has had to replace tires on his trailer has probably wondered why they are typically more expensive than economy auto tires, and what the major differences are. What pressure should you run them at? Why does it seem like you are  always replacing them? What are the reasons for uneven tread wear?

Trailer tires are not designed for traction, except when braking, and do not have to meet the all-weather standards of automotive tires. They are designed with a harder and stronger sidewall to help reduce sway. Automotive tires with softer sidewalls will magnify trailer sway problems.

Trailer tires come in two basic types, Bias-Ply and Radials. Bias Ply tires have nylon or Polyester cords criss-crossing from bead to bead, giving the sidewalls the same ply as the sidewalls and making for a very stiff tire sidewall. The cords are also larger than comparable passenger car tires to meet load rating requirements and reduce wear. This maximizes resistance to sway. Bias-Ply tires are typically used on trailers that do not get high mileage-use, such as boat and utility trailers. Driving long distances non-stop at highway speeds can  break down bias-ply tires quickly and cause “cupping” which is uneven wear on the tread, due to the tires’ hard sidewalls and subsequent inability to expand properly when they get hot.

Radial tires have steel belts below the tread and sometimes the sidewalls, and softer sidewalls, making them excellent choices for long distance towing, but also increasing the chance of sway on improperly balanced or loaded trailers. They have better traction than bias-ply, which is irrelevant in most cases except for sudden stopping. They are always more expensive than their bias-ply counterparts, but both tires carry the same weight rating at similar load ranges.

Trailer tires are made NOT to wear out! “ST” tires (for trailers) contain chemicals in the rubber compounds to resist weather and sun damage. The most common reason for tire failure is underinflation. Trailer tires are designed to be used only at their MAXIMUM inflation. Trailer tires take a much higher psi than automotive tires. The stiffer walls are designed to withstand the shocks of road hazards even though the trailer suspension is inferior to an automobile’s. A trailer tire’s lifespan is expected to be anywhere from 5,000 – 12,000 miles.

Trailer tires are designed to be replaced every 3-5 years. Time and elements reduce a tire’s weight rating by about 1/3rd in approximately three years. It is suggested that you replace trailer tires every 5 years regardless of visual appearance.

ST Trailer tires are designed to travel at a maximum 65 MPH. As tire heat builds up, the tire starts to weaken and disintegrate. Running on a hot, weakened tire results in costly blowouts.

LT trailer tires are NOT the same as “Light Truck” tires. The “LT” on trailer tires specifies a load range. Trailer tires cannot be used on automobiles.

For more information, please visit our website at

http://www.rwtrailerparts.com

Rob Wiseman

R W Trailer Parts, LLC

Linthicum, MD

Posted in Uncategorized | Leave a comment

Should I use Bearing Buddies on my Utility Trailer?

I get this question frequently from customers, and I have recommended to many of them that purchasing “Bearing Buddies” is not a benefit unless the trailer gets dipped into water. Many trailer owners assume that replacing their dust caps with Bearing Buddies is equivalent to repacking their hubs and that as long as the cap is full they won’t have any wheel bearing issues. What a BB does is fills your hub completely with grease, while keeping a slight amount of positive pressure in the hub to help prevent water from possibly running in through the grease seal when the trailer hub is submerged. For boat trailers, BB’s are in most cases a necessity. However, wheel bearings should be checked regularly and the grease still needs to be completely removed and replaced with fresh grease when you see signs of grease failure, such as a change in color or loss of viscosity. Anytime a bearing buddy is used, be sure your hub has a “double-lip” grease seal with a spring to hold the extra pressure the BB puts on it. Bearing Buddies do not have to be constantly pumped with grease. Once the hub is full, look for indications that the BB needs a grease refill before adding. If the BB is full, leave it alone. Over-pumping can force the grease seal to leak, and if you have drum brakes that will basically remove friction and render the brakes useless.

If you have EZ-Lube axles, I recommend the “Kodiak” or “Red Eye” style of bearing buddy, since it does not have a spring-pressured disc that moves into the cap. EZ Lube axles feature a grease fitting at the end of the spindle, and that will often interfere with the BB’s disc movement. I have seen BB’s pop off because the grease fitting will not allow certain caps to seat properly. “Red Eye” style caps have a red button at the fitting base that just “pops out” when enough positive pressure is in the cap.

For utility trailers, consider how a BB works and decide for yourself whether or not they are a good investment for you. The added grease that you pump into the BB cap does not circulate through the trailer hub. It puts added pressure on your grease seal. BB caps are heavier and longer than standard caps, and that makes them particularly vulnerable when your wheel strikes a pothole or other road hazard. They fly off regularly for no apparent reason. Polyurethane BB caps seem to hold better to sudden shocks, and are cheaper, but if the new grease doesn’t circulate or push out the old grease, then you’re not really getting anything out of it.

Visit our website!

http://www.rwtrailerparts.com

Posted in Uncategorized | Tagged , , , , , , | Leave a comment

Repacking Trailer Wheel Bearings

Most utility and marine trailer hubs are packed with bearing grease. In this blog we’ll discuss how to determine when to clean and repack your hubs, and how to accomplish this without any special tools. To begin, assemble the following common household items:

Large Channel-Locks, Pliers, a plastic or disposable container to clean bearings in, shop rags or strong paper towels, a small block of wood approx 4″ square, a good grease-cutter (paint thinner will work, though it’s not the best), rubber gloves, a hammer or rubber mallet, floor or vehicle jack and jack stands (2 per axle), premium wheel bearing grease (I like Pennzoil 707L), and a new cotter pin or tang washer (for EZ-Lube axles). To really fill your hubs, you will probably need a 1# can of grease for each axle (2 wheels). Also, have replacement grease seals handy. I always look for “double-lip” seals, as they are not much more than single-lip, but they have a spring inside the rubber that helps keep a tight fit on the spindle base.

Put your jack directly under the axle, behind the wheel and u-bolts attaching axle to leaf springs, or behind attachment brackets on tor-flex axles and lift the tire only a few inches off the floor. Place a solid tripod stand on the axle, move the jack and lift/secure the opposite side of the axle. Spin the wheel and listen for any rumbling sound while putting your hand on the fender to feel for strong vibrations. Bad bearings will grind and usually make a racket. Next, open your channel-lock and grab opposite sides of the dust/hub cap. Work back and forth on the cap to rock it out without much damage. Take a good look at the grease. If it has its original color and isn’t brown, discolored or runny, and the wheel has passed the sound and vibration test, then your bearings are almost always in good condition and your grease likely does not have to be changed. If you are lucky enough to have EZ-Lube axles, now would be the time to pump grease into the grease fitting at the end of the axle, and pump until grease is virtually spilling out of the hub. Replace the cap and repeat the process on other wheels. Tap the cap lightly with hammer or mallet while gently spinning the wheel to get it seated.

If grease needs to be replaced, remove the hub (with the tire and wheel still attached) by first removing the cap as suggested above. Then determine if the hub has a cotter pin or tang washer. If your spindle has a grease fitting and a “D” shape, then push into the open slots in the “castle nut” with a small flat-head screwdriver and bend the metal tab away from the nut and towards the spindle. This tab may be hard to see, but is always on the flat side of the spindle, so there will be only a couple of places on the nut where it could be. Once the washer is out of the way, remove the castle-nut with your channel-locks. For axle nuts with cotter pins, simply straighten the pin out as much as possible with your pliers, then grab the “U” end and yank it out. I like to use my linesman’s pliers, grab the pin in the “cutting”side of the jaws, and use the hub as leverage to pull it out. When the nut is nearly off, position a rag just below the hub opening to catch the outer bearing, nut and washer and keep it off the floor. Put into your cleaning bucket with your solvent and swish it around. A small paintbrush will help remove the grease. Flip the hub and tire/wheel over to access the grease seal. I keep the tire attached to make seal removal easier in this step. Open your channel-locks all the way and put the end of the upper jaw under the lip of the seal. Putting your knee or foot on the wheel to keep it stable, push down on the pliers to pop out the grease seal in one swift motion. Discard seal or clean and take with you to your parts dealer to measure for a match. Not all seals are the same, and some hubs can use multiple seals depending on the width of the trailer spindle. Clean bearings with solvent and brush. If you have an air compressor, use it to blow off the excess solvent. Make sure all solvent is removed before packing the bearings. Use rags or towels to completely remove all old grease from the hub.

Inspect your bearings, looking for discolorations, bent bearing cages, or any spotting. I like to run my fingernail up and down the rollers to check for any scratches in the steel. If there are any rough areas on the rollers, the cage is excessively loose, or if the bearing is questionable in any way, replace it. If the bearings are pitted, then the “cup” or race is probably also pitted. Inspect hub races and run your fingernail over them as you did the bearings. Any pits or rough areas will produce heat and friction and could lead to hub and axle failure. If races need to be replaced, ideally a brass rod (to prevent scratching the harder race) would be used to knock the race out from its rear by tapping the rear edge of the race side-to-side until it falls out. A strong punch or screwdriver can be used in place of brass rod. If you don’t have a “race driver” set to install the new races, try this method: Put the new race loosely into the hub (flat side towards hub interior, or course). Place the OLD race on top of the new one so the the outer edges are even with each other. Center a 2″ hitch ball, ball side towards hub, and into the center of the old race and tap with a hammer until the new race is seated fully into hub.

Like myself, most people do not have a bearing packer. I put a palmful of grease in one hand and use the other to push my bearing into my palm, forcing grease into the roller by rotating and pushing the bearing over and over into the grease. Keep rotating and pushing the bearing firmly into the grease, taking care to make sure the bearing is completely packed. Set aside on a clean rag and pack the remainder of your bearings. Flip the hub/wheel to expose the rear and put a scoop of grease into the hub. Place rear bearing into hub, sitting fully into the race, and place edge of grease seal into the hub opening. Put a block or small 2×4 on top of the seal and tap into hub with a hammer or mallet, seating grease seal fully into hub but even with the hub’s edge. Do not drive seal beyond the edge of the hub or the seal will not sit properly on the spindle base! Flip tire and wheel over and install outer bearing loosely into the hub. Place hub on spindle, working the spindle through the outer bearing and press bearing into the race to set it. Push spindle washer all the way to the outer bearing and then install the axle nut (if using a tang washer, put on between washer and nut). Manufacturers will recommend hand-tightening the axle nut, but I like to use channel-locks to thread the nut until just snug, then back off enough to install the new cotter pin or bend the tang washer into the nut. This will allow just the slightest amount of “play” in the hub, which is recommended. Tightening the nut too much here will create friction and heat and can cause premature bearing/grease failure. Spin the wheel. It should spin freely and with no noise. Note: on braking axles, you will hear shoes lightly touching the spinning drum wall if brakes are adjusted properly. Tap the hub cap in carefully while the wheel is spinning, a little at a time, using the small wood block as a buffer to minimize damage to the cap. If you are using “bearing buddies” here, use a grease gun on the cap’s fitting and pump until cap is full and grease starts to come out of the escape hole near the top of the cap (make sure you are using grease compatible with your “tub” grease).

Until next time!

Rob Wiseman, R W Trailer Parts, LLC

Please visit our website at http://www.rwtrailerparts.com

Posted in Trailer Repair | Tagged , , , , , , , | 2 Comments

Diagnosing and Repairing Trailer Lights and Wiring

For most consumers, trailer wiring repair can be a frustrating experience. Diagnosing the root of the problem early in the process is the key. I recommend a 12 volt stick-tester to check your wiring and plug for continuity as the first step in any electrical repair. Plug testers are available for all types of trailer plugs, but a stick tester can be used on any receptacle and can test wiring between connections. And they typically cost less than ten bucks.

First, with the trailer wiring plugged into your tow vehicle, turn on your running lights. I recommend doing this with the hitch not connected to the trailer coupler, for reasons we will explain later. Do a walk around the trailer and check to see if all lights are lit. If your tow vehicle blows a fuse during this phase, first remove your trailer tail-light lenses and check for blown bulbs (usually black or creamy white inside if blown), and also check to make sure the bulb is in correctly. The industry standard for trailer tail lights is an “1157″ bulb, which is installed by pushing into the light socket and twisting it so that both contacts rest on the tail-light prongs. If the bulb is only “half-twisted” in, then both filaments will light, as the bulb’s two contacts will touch both tail-light prongs. This will create a dead short when a turn signal or brake is used with the running lights on, and can also result in all marker lights blinking or illuminating along with the turn signals or brake lights. Next check behind the tail lights, and then behind each marker light to see if the hot leads to any of them might be crushed between the light housing and the trailer frame from improper installation. This is a common problem, prevalent on new trailers. A tail light wire could have been crushed behind the housing during installation, but the inevitable short may not surface for long periods of time, perhaps when moisture gets behind the light and completes the circuit. Most lights are connected to the trailer with ¼” bolts and will require a 7/16” wrench to loosen the nuts. Pull the housing away and make sure the wire(s) are run through the provided channel behind the light to avoid smashing them on re-install. If any wires are exposed, then replace that section with new, insulated wire. On most trailer lights, 14 to 16 gauge wire is sufficient.

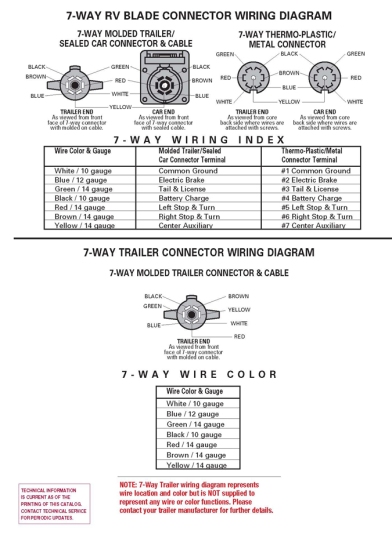
With the running lights still on, turn your ignition key enough to operate  turn signals and put it in “left” or “right” turn (NOT hazard flashers). Do another walk around and check each turn signal. Are any running lights flashing? If so, and you have already checked the bulbs and wiring on the previous step, then you probably have a bad ground. The ground problem could be on the tow vehicle or trailer, but sometimes you can get a sporadic ground through the hitch ball and coupler connection, although it isn’t a stable enough ground to rely on for lighting and electric brakes. Unplug your trailer and connect your light tester “ground” to the tow vehicle ground terminal. This is the “male” post on a 4 or 5-way flat plug, or at roughly “7 o’clock” as you look into the 7-way plug typically included in factory hitch packages. Turn on running lights and a turn signal and test by putting your stick tester to the terminals. On a 4 way, tail lights are the brown wire, yellow and green are left and right turn/brake respectively. On a 7-way, left turn/brake is at “9:00” and right turn/brake is at “3:00” and running lights are at “11:00” or above the left turn. If all functions are working, move on to the next step. If not, then ground your tester to the tailpipe (the hitch sometimes has too much paint on it to get a ground) or steel bumper and re-test. If the tester is lighting now and didn’t light using the vehicle plug’s ground, then you need to ground the tow vehicle plug. Check for a broken wire coming out of the plug. The ground should be a white wire. Ground this using a wire “eye” terminal directly to the frame using a self-tapping screw and re-test. If no broken connections are found, then open the plug (if possible) by removing the screws in the side of the housing and checking all wire connections to the terminals. On a 4-way, this will not be possible. Some vehicles have 7-way plugs that will not be repairable in this fashion and must be replaced. 4-way plugs sometimes lose their connections inside the molded housing and are not repairable.  Replace as needed. If I am not getting a test light at the terminal, I like to stick the pointed tester into the wire leading to the rear of the plug to see if there is any signal going to the plug, while grounding to a reliable ground source (such as a tailpipe).

If some of the functions in the plug work, the ground is likely fine and you need to check wiring and fuses going to the plug. On aftermarket installations, some vehicles (those with separate turn and brake lights) incorporate a “converter box” to merge those functions so the trailer lights will operate with either turn or brake using the same wire. It is essentially a box of diodes, and these can and do burn out. Test all functions going “into” and “out” of this converter box. If you have turn and brakes (separate functions on this type of vehicle) coming from the vehicle into the converter box, but not working coming out of the box (and merged with the turn signal function) then you have a bad converter. Snip the wires and splice a new one into the wiring harness.

Many vehicles have factory tow packages, which incorporate a separate fuse block for towing functions. This system is preferable, in that a blown fuse from malfunctioning trailer wiring will not affect the tow vehicle lights, which are on a different circuit. If no signal is reaching the plug, check the owner’s manual (usually towards the rear of the manual) to locate the towing package fuse placement and pull them out one at a time. There is usually a separate fuse for running lights, left and right turn (and 12v hot, electric brakes, etc. as needed). Most tow package fuse blocks are located under the hood. All tow packages are already converted if tow vehicle has separate turn and brake functions.

Once the vehicle wiring is deemed to be operating, it is time to plug it back into your trailer and take another look at the lights. If trailer lights still flash on and off with tail lights and a turn signal on, then the trailer has a bad ground. Check the white wire from the plug and make sure it is properly attached to the frame, usually near the coupler. Note: On tilt-bed trailers, the lights are usually attached to a frame that is NOT permanently attached to the tongue of the trailer. A ground wire needs to be run either directly to the trailer light attachment bolts from the plug, or at a minimum the wire needs to be run to the “tilt-bed” part of the trailer. This is the only way the lights will be able to use the tow vehicle’s ground on this type of trailer. Although a sporadic ground is sometimes transferred to the tilt-bed, since the bed moves independant of the main frame, the ground will not be consistent.

For more information, please visit our website: http://www.rwtrailerparts.com

or e-mail me direct: rob@rwtrailerparts.com

Posted in Trailer Repair | Tagged , , | 119 Comments